

Signed Cookies
Introduction
What are Signed Cookies?
A signed cookie is a mechanism to ensure the integrity of the data stored inside a cookie. In the Qencode API, this secure HTTP cookie (referred to as the Qencode-Auth-Token) contains a JSON Web Token (JWT) that is signed using a secret key that is stored securely on your server.
Why Use Signed cookies
HTTP cookies are commonly used for tracking sessions or storing user preferences. Signed cookies allow you to go a step further by extending authorization access to media content for the session as a whole. Since they are cryptographically signed, you can ensure their authenticity without having to authorize the user for each piece of content. Signed cookies are particularly useful for authenticating Adaptive Bitrate Streaming content such as HLS or DASH, since authenticating multiple segments would otherwise require sophisticated re-authentication for each chunk.
The Signed Cookies Workflow
- Cookie Generation: Your web application generates a signed token and sets it as a Qencode-Auth-Token cookie for all subdomains of your primary application domain. Learn more about the signed token structure and generation process in our Generate Signed Tokens Tutorial
 .
. - When the web page with a video player requires content, it sends a request to a subdomain dedicated to playback and includes the
Qencode-Auth-Tokencookie. - Qencode CDN validates the token extracted from the cookie and authorizes the content request. If validation is successful, the requested content is delivered to the video player.

Pre-requisites
To effectively utilize the signed cookies feature, please ensure that:
- Custom Domain: To start, you should prepare a custom domain configured for content delivery. Usually this is a subdomain of the main domain used by your web application. Learn more about how to configure these settings in our Custom Domains tutorial.
- Signing Key: Next, you should create a Signing Key for your custom domain. Learn more about how to create Signing Keys using the Qencode UI or API in our Signed URLs tutorial.
1Configure Domain for Signed Cookies
When implementing signed cookies for content authentication, it's essential to have a well-configured domain setup. This not only ensures smooth content delivery, but also enhances security, as the right domain configuration restricts unauthorized access while allowing authenticated users to seamlessly access the media content.
Here's a breakdown of how domains should be set up when integrating signed cookies into your application:
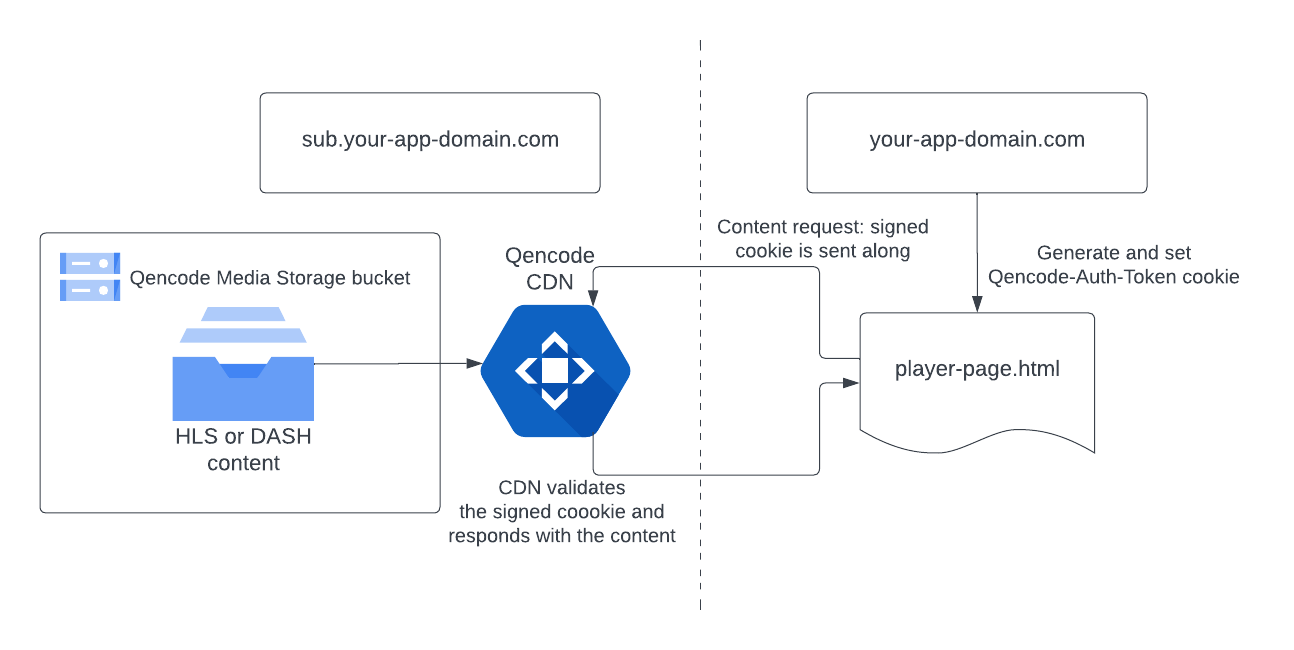
Example of the domains setup to be used with signed cookies
-
Set up the domain and subdomain to be used for content delivery. Let’s assume the domain name is
your-app-domain.com, and the subdomain name issub.your-app-domain.com. -
Set up the page with a video player and playback. Let’s assume the playback page is located at:
https://your-app-domain.com/player-page.html. -
Your video content is located in a Qencode Storage Bucket (S3) and is accessible via the Qencode Content Delivery Network (CDN).
-
A custom domain for this Media Storage Bucket. This can be set up using the using Qencode UI or API (see our Custom Domains tutorial
). -
The bucket access policy to Authenticated (see our Signed URLs tutorial
).
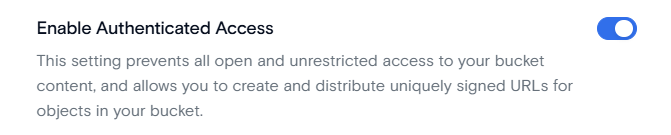
Set bucket access policy to authenticated
2Configure CORS Policy for the bucket
CORS is a security measure that restricts web pages from making requests to domains different from the one that served the web page. This is especially relevant when your web page and its content are served from different domain names (like the main domain name and the subdomain name). To ensure that the browser permits these cross-origin requests, the CORS policy must be set to allows the video player on your main domain to request content from the subdomain.
To configure CORS for cross-origin requests, specify your domain in the Access-Control-Allow-Origin header. This tells the browser to allow web content to be requested from this specified domain. You must also enable the Access-Control-Allow-Credentials header so that the browser to includes cookies and authentication details in these requests. Without this the video player will not be able to send the Qencode-Auth-Token cookie to the CDN, which is essential for accessing the protected content.
These headers should be set as:
-
Access-Control-Allow-Credentials: true -
Access-Control-Allow-Origin: <https://your-app-domain.com>
- Generate the API access token using the POST /v1/access_token method.
- Use the POST /v1/buckets/<bucket_name>/cors API method to set the CORS policy for the bucket.
- You can verify the settings using GET /v1/buckets/<bucket_name>/cors API method.
Request example (make sure to replace <your-app-domain> and <your-bucket-name> with the actual values):
You can set the CORS policy for the bucket.
curl -X POST 'https://api-cdn.qencode.com/v1/buckets/signed-cookie-test/cors'
-H 'Authorization: Bearer $ACCESS_TOKEN'
-H 'Content-Type: application/json'
--data '{
    "Access-Control-Allow-Origin": "https://your-app-domain.com",
    "Access-Control-Allow-Methods": "GET",
    "Access-Control-Allow-Credentials": "true"
}'Gets bucket CORS policy.
curl -X GET 'https://api-cdn.qencode.com/v1/buckets/signed-cookie-test/cors'
-H 'Authorization: Bearer $ACCESS_TOKEN'
-H 'Content-Type: application/json' The request returns the CORS headers
{
  "Access-Control-Allow-Origin": "https://your-app-domain.com",
  "Access-Control-Allow-Methods": "GET",
  "Access-Control-Max-Age": "3600",
  "Access-Control-Allow-Credentials": "true"
}
The response example from the API call provides key CORS configuration settings for your bucket. These settings are crucial for defining how cross-origin requests are handled, ensuring security and proper functionality of your web application. Let's break down what each field in the response indicates for a clearer understanding of their roles.
-
Access-Control-Allow-Origin: Specifies the domain allowed to access resources from the bucket. In your case, it's set to your web app's domain, allowing requests from this domain to access the bucket's content.
-
Access-Control-Allow-Methods: Lists the HTTP methods permitted when accessing the bucket. Here, "GET" is allowed, meaning that the bucket can be accessed using GET requests.
-
Access-Control-Max-Age: Defines the duration (in seconds) for which the browser can cache the CORS response. "3600" means the response can be cached for an hour.
-
Access-Control-Allow-Credentials: Indicates whether the browser should include credentials, like cookies, when making requests to the bucket. "true" means credentials are included, which is essential for implementing Signed Cookies effectively.
These settings ensure the secure and correct functioning of cross-origin requests.
Here’s how you can set the CORS policy for the bucket using UI:
-
Select Media Storage → Buckets from the left menu
-
Select your bucket and open its Settings.
-
Specify
https://your-app-domain.comas the Origin (please don’t forget to replace this with your actual domain name!). -
Make sure you have at least
GETchecked as one of the allowed methods. You can enable other methods as needed. -
Enable the Allow checkbox in Allow Credentials section.
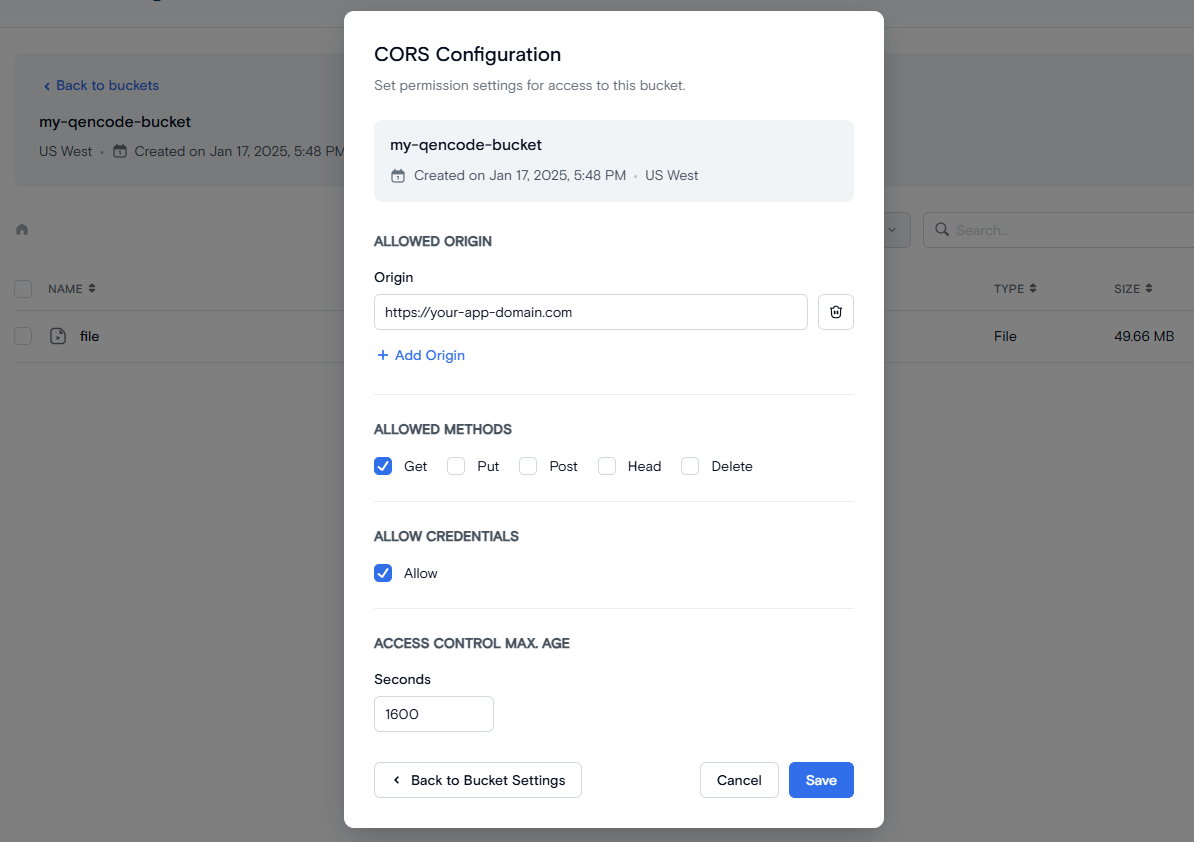
Setting CORS policy for the bucket
3Set up your Video Player
For the video player to handle Signed Cookies correctly, it must be first configured to include credentials (such as cookies) in its requests to the server. In order to send the Qencode-Auth-Token cookie with each request using Qencode Player, you must enable the withCredentials parameter.
Here's the Qencode Player configuration example:
qPlayer('player', {
            licenseKey: 'replace-with-your-qencode-player-license-key',
            videoSources: { src: "https://sub.your-app-domain.com/video1/playlist.m3u8" },
            withCredentials: true
        });
The code above below illustrates this example for the Qencode Player, but similar steps can be applied to other HTML5 video players, including open-source solutions like video.js or hls.js. Always ensure that your application generates a signed token and sets the Qencode-Auth-Token cookie before the player requests content to ensure that authenticated access to your video content is secured across platforms.
Need More Help?
For additional information, tutorials, or support, visit the Qencode Documentation page or contact Qencode Support at support@qencode.com.